

Imagine having a communication system that lets you make and receive calls over the internet, without relying on traditional phone networks. That’s what a VoIP SIP client enables.
In this article, you’ll learn how to build your own VoIP SIP client using MirrorFly’s pre-built voice calling solution.
Follow these 7 steps to build your own VoIP SIP client:
- Step 1: Set up a MirrorFly account
- Step 2: Install the SDK
- Step 3: Initialize the SDK
- Step 4: Configure SIP Account
- Step 5: Registering a User
- Step 6: Making and Receiving Calls
- Step 7: Implementing Call Controls & Launch
Not happy with the business phone system you currently have?
It’s true that traditional office phones have their own disadvantages. You need expensive hardware, complicated wiring, and the maintenance is a bit costly as well.
What if I say, your team will just need an app with VoIP solution on their computers and smartphones to make professional calls?
That’s what a SIP Client will do.
💡Did You Know?
Over 70% of businesses had switched to an internet-based phone system by 2023 for 2 reasons: To save money & to add new features.
The bigger bonus, of course, is that these systems work anywhere there’s an internet connection. Teams can operate typically from anywhere: while commuting, across any location, or when on a business trip.
In this guide, I’ll take you through what a SIP client (softphone) is and go over how to create one to meet your particular needs.
Note: This article about building a calling app does not require you to have a technical background.
What is a SIP Client?
A SIP client is simply for phone calls through the internet.
| 📌 A SIP client (or modernly called the softphone) is an app that runs on your computer, tablet or smartphone to work as a business phone. |
Instead of using traditional phone lines to transmit voice, it makes use of the Internet. It sends your voice in the same way you would use Zoom or FaceTime, but majorly for business communication only.
The functionality is more like the traditional phones on your office desk. It has a dial pad, transfer, hold, and so forth. Just that, it is a software and not a hardware form.
This guide will cover a few technologies.
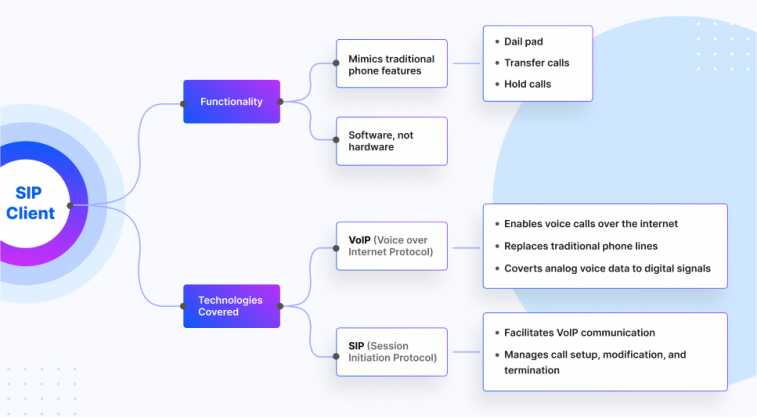
I’ll briefly take you through the key terms you’ll read in this guide on and on.
- VoIP: Voice over Internet Protocol. It is the technology that enables voice calls over the internet. It replaced the traditional phone lines with VoIP phone services, by converting voice data (analog) into digital signals that can be transmitted through the internet.
- SIP (Session Initiation Protocol): I’d like to call this protocol the language used for communicating phone calls across internet-based phone systems. It is a key protocol used in VoIP telecommunications networks and video conferencing systems. It is basically used to initiate, manage and terminate the communication sessions.
- Softphone: An instant messaging & calling app you can install on your computer or mobile device to use it as a telephone.
- SIP Client: Another name for a softphone. It is the software that connects to SIP-based telephone services.
You’ll come across these terms throughout this article. A basic coverage of these terms will help you understand the upcoming sections better.
Why Should You Build VoIP SIP Client?
When you compare with conventional phones, Internet-based telephone systems (SIP VoIP) offer several advantages to businesses. These are some of the benefits you will reap:
- Reduce expenses: There is a huge chance that you’ll lower your phone bills by 40-60%. Approximately, a company with 25 staff can usually save $500-$1,000 each month by transitioning when using a SIP client (internet-based phone communication system).
- Work From Anywhere: Your team can make calls from the office, home, or while traveling. They can use the same phone number and system.
- No Additional Hardware Required: All you need is a computer or a smartphone that you already use. You need not purchase any kind of desk phone, especially the expensive ones.
- Additional Features: Your team can enjoy modern features such as automatic call forwarding, voicemail-to-email, call recording, and team video meetings. You’ll not need any additional equipment or software to enable these features.
- Expands Alongside Your Business: Want to upscale? No worries. You can add additional users in just minutes. You’ll not need any extra hardware for this.
These are just some of the most important reasons I’d like to mention why building a SIP VoIP client is an important decision for your business.
To understand this further, let’s see how traditional and internet phones work, along with the difference in them.
Traditional vs. Internet Phones (SIP Clients)
Firstly, we’ll understand what happens when you make calls from a regular telephone and with a softphone:
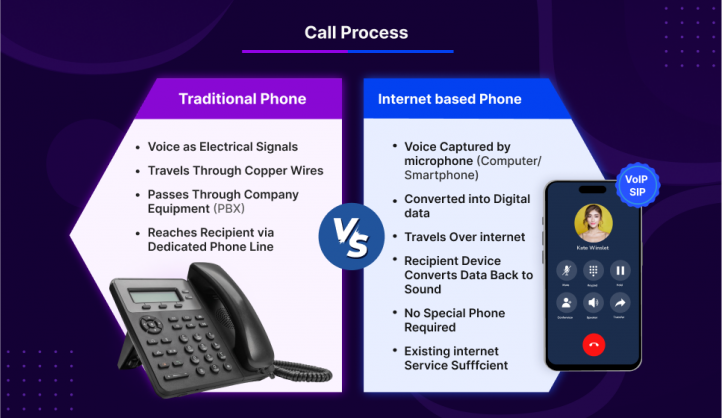
Traditional Phone System
When you make a call on a traditional phone:
- Your voice travels as electrical signals through copper wires.
- These signals pass through your company equipment, probably a phone.
- The signals reach the other person’s phone, through a dedicated phone line and specialized equipment.
Internet-Based Phone System (SIP VoIP)
You can expect this process at the backend, when you make a call with a softphone:
- With VoIP in mobile devices, your voice is captured by your smartphone microphone
- It is then converted into digital data
- This data travels over your regular internet connection and reaches the recipient device
- The recipient’s device converts this data back into sound
You can notice that you’ll not require a special phone for this. Just your existing internet service is sufficient.
💡Did You Know?
An average business desk phone costs $800-$1000 per employee when you include hardware, installation, and maintenance. But with softphones, these costs nearly become ZERO because you’re using devices you already own.
Isn’t this a 2x benefit? Your expenses reduce + you get a modern communication system in place. If you are convinced with this fact, let’s move on to building your own business phone system.
How to Build a VoIP & SIP Client? (2026 Guide)
Honestly, there’s no one way. You can build your Internet-based communication system in 3 different ways. Let’s explore them one by one.
Option 1: Use Ready-Made Softphone Apps (Easiest)
This is by far the simplest approach to implement softphones in your business. You just have to sign up with a SIP VoIP provider and use their recommended softphone apps:
What you’ll need:
- A SIP VoIP service provider account (similar to choosing a cell phone carrier)
- Their recommended phone calling apps installed on your devices
- Internet connection for each device
How it works:
- You’ll sign up with a SIP provider to enableVoIP calling capabilities
- Next, you’ll download their softphone app to your computers/phones
- The provider will give you login credentials
- You’ll login with those details
- From there, you’ll start making and receiving calls
Perfect for: Small businesses that need a simple, quick solution with only a minimal setup.
Option 2: Choose Your Own Softphone Apps (More Flexible)
For more flexibility, you can mix and match providers and VoIP calling apps:
What you’ll need:
- A SIP VoIP service provider account
- Your choice of VoIP calling apps (many free and paid options exist)
- Your provider’s connection settings
How it works:
- Sign up with a SIP VoIP provider
- Get your SIP account credentials and server information
- Download your preferred VoIP apps to your devices
- Configure the apps with your account information
- Start using your customized system
Perfect for: Businesses that want specific features or interfaces that the provider’s default VoIP calling app doesn’t offer.
Option 3: Custom Development (Most Customizable)
For a completely customized solution, you can develop a custom SIP client:
What you’ll need:
- Software development resources (in-house team or outside help)
- A clear list of the features you need
- Development tools and SIP building blocks (SDKs)
- Time for development and testing
How it works:
- Define exactly what you want your phone system to do
- Work with developers to design the solution
- Use development tools to build your custom system
- Implement for your team
Perfect for: Any size of business with specific needs, or organizations with custom security requirements.
Building a Custom VoIP SIP Client: Step-by-Step Guide
SIP client development is easiest when you know exactly what to build. Let’s simplify it by breaking down what you’ll need at each development step.
Step 1: Make a Wishlist of Features
List out everything that you want in your phone system:
Basic features:
In the first stage, we’d recommend you to go with only the primary features such as calling capabilities, call hold, transfer, and conferencing. As you test and resolve bugs at this stage, it becomes easier to go with adding on team features like contact sharing, call forwarding and presence indicators.
Advanced features:
As you gain more users to your SIP app, you can expand the feature list with call recording, voicemail transcription, and automated menus. It is also a wide option to add integrations that can connect your calling app with customer databases or CRMs, email apps and helpdesk plugins.
| 📌 MirrorFly Pro Tip Define the specific details of your requirements. Write them down with elaborate details. For example: Call record feature that can store call data for 90 days.This helps you create a roadmap clearly instead of having to change everything after you’ve built them all. |
Step 2: Choose An SDK
If you are all set to carefully curate and build your VoIP application for your business, you’ll need SDKs (Software Development Kits). These are software which have pre-built libraries and tools you can use to create a SIP app 10x faster than writing every line of code yourself.
Got questions about customization when building with SDK?
No worries, SDKs like MirrorFly often come with a 100% customizable solution to build apps just the way you want in 48 hrs. You’ll have 1000+ features, full data control and above this, you can white-label your platform.
Step 3: Choose How You Want To Develop Your SIP Client
Human resources can be one of the key factors that impact your SIP client development. A few companies will have their own team and a few may look to outsource developers.
Considering all, here are 3 options we’d like to list:
- In-house development: You can use your own IT team, provided they have all the key skills related to build a SIP app platform.
- Hire developers: There are dedicated SIP experts out there. You may hire an individual or a team of SIP specialists depending on your requirements, for this specific project.
- Partner with a solutions provider: The third one is an unique option where you can partner with a platform that specializes in communication solutions. This way you get your SIP system built and the maintenance taken care of.
If you are somewhere between a small and medium sized business, working with a reliable SIP solution provider can offer the best balance of affordability and customization.
Step 4: Design the User Experience
First impressions are the best impressions, they say. How your SIP app will look and feel at the first instance, makes it all about customer conversion.
- What must your SIP client look like? What features should it have front and center?
- If people have to transfer calls or set up conferences, which button will they use, what color they must be?
- Will people have the same experience in all the web & mobile VoIP apps the SIP client is installed on?
Ask many questions like these and get on to build the best SIP platform out there. You can also avail a UI Kit to develop a complete app with pre-built features from trustworthy SIP VoIP solution providers.
Remember, building the best design is not about making the looks great alone. It is about making common tasks simple and quick, without clutter that may distract user experience.
Step 5: Development of SIP Client
I’d like to break this section into 2 parts:
- Developing a SIP Client Without an SDK
- Developing a SIP Client Using MirrorFly SDK
You can choose any of these 2 options to build your SIP Client.
MirrorFly Pro Tip
Skip to Part 2, if you’d like to build your SIP Client in 48 hrs
👉 Part 1: Developing a SIP Client Without an SDK
As we discussed, you can build a SIP Client from scratch and write every code by yourself. In this part, we will create a sample SIP client with basic features, without using any SDK.
Step 1: Understanding SIP Basics
In this strategy, you’ll need core components like User Agents (UA), Registrars, and Proxies. Some of the key methods you’ll use include REGISTER, INVITE, ACK, BYE, and CANCEL.
Step 2: Choose a Programming Language and SIP Library
Next up, you’ll need to choose the programming language you’ll use to build the app. Some of the common choices include Java, C/C++, JavaScript, and Python.
Along with a language, you’ll likely want to use a SIP library.
Why do you need them?
There are a few underlying processes like signaling, message parsing, and state management that you need to implement all by yourself, without pre-built SIP libraries. Instead of having to sit down for months to write these codes, there are ready-made options you can go with. This typically makes development much easier and faster.
Some examples of SIP libraries for different languages are JAIN SIP and Peers for Java, PJSIP and Sofia-SIP for C/C++, SIP.js and JsSIP for JavaScript, and PJSUA2 for Python.
Step 3: Set Up Development Environment
Now you need to prepare your computer for programming.
Make sure that your computer has the programming language you’ve chosen and all related tools and frameworks.
Install the required SIP libraries. You can do this by using a package manager or adding dependencies to your project.
Once you’ve set up your system, configure the IDE (or text editor) to identify the language tools and libraries.
Step 4: Implement user registration
In this step, your SIP client logs in to the SIP server.
// Example using PJSIP in Java
try {
    // Create SIP transport
    TransportConfig transportConfig = new TransportConfig();
    transportConfig.setPort(5060);

    // Create SIP account configuration
    AccountConfig accCfg = new AccountConfig();
    accCfg.setIdUri("sip:user@sipserver.com");
    accCfg.getRegConfig().setRegistrarUri("sip:sipserver.com");

    // Set credentials
    AuthCredInfo cred = new AuthCredInfo("digest", "*", "username", 0, "password");
    accCfg.getSipConfig().getAuthCreds().add(cred);

    // Create account
    MyAccount acc = new MyAccount();
    acc.create(accCfg);

    // Register to SIP server
    acc.setRegistration(true);
} catch (Exception e) {
    System.out.println("Registration failed: " + e);
}
The example uses the PJSIP library in Java. It shows the following:
- Set up a communication channel using PJSIP (usually on SIP port 5060).
- Create an account setup where you enter your SIP address (e.g., sip:user@sipserver.com) and the server’s address (sip:sipserver.com).
- Add your login details (username and password) so the server can recognize and verify you.
- Create an account using this setup.
- Tell the account to connect to the SIP server.
- If something goes wrong during the connection, the code will show an error message.
Step 5: Implement VoIP Call Management
In this step, you’ll add the functionality to make and receive calls.
// Making a call
try {
    CallOpParam prm = new CallOpParam();
    prm.setStatusCode(pjsua_constants.PJSIP_SC_OK);

    // Create call object
    MyCall call = new MyCall(acc);

    // Make outgoing call
    call.makeCall("sip:recipient@sipserver.com", prm);
} catch (Exception e) {
    System.out.println("Call failed: " + e);
}

// Handling incoming calls by extending Call class
class MyCall extends Call {
    @Override
    public void onIncomingCall(OnIncomingCallParam prm) {
        CallOpParam callOpParam = new CallOpParam();
        callOpParam.setStatusCode(pjsua_constants.PJSIP_SC_OK);

        try {
            // Answer call
            this.answer(callOpParam);
        } catch (Exception e) {
            System.out.println("Answer failed: " + e);
        }
    }
}
The example shows how to create a call object and use it to dial a specific SIP address.
- When someone calls, a special function called onIncomingCall is triggered.
- The example extends the Call class and customizes this function.
- It shows how to automatically answer the call.
- If there’s an issue while answering, an error message is displayed.
Step 6: Implement Media Management
This step manages the actual voice or video communication.
// Configure media
MediaConfig mediaConfig = new MediaConfig();
mediaConfig.setClockRate(8000);
mediaConfig.setQuality(4);

// Configure audio device
AudDevManager audDevManager = endpoint.audDevManager();
audDevManager.setInputVolume(1.0);
audDevManager.setOutputVolume(1.0);- You need to set up media settings, like audio quality (clock rate and quality level).
- You also need to control audio devices, such as adjusting the microphone and speaker volume on your computer or phone.
Step 7: Add Session Management
In the next step, you need to add features to control ongoing calls such as
- Holding and resuming calls by pausing and continuing them later
- Transferring a call to another person
- Implementing conferencing to allow multiple people to talk at the same time
The code goes like this:
// Implementation for call hold/resume
public void holdCall(Call call) {
    try {
        CallOpParam param = new CallOpParam();
        param.setOptions(pjsua_call_flag.PJSUA_CALL_UPDATE_CONTACT);

        // Create media session
        CallMediaInfoVector mediaInfos = new CallMediaInfoVector();
        CallMediaInfo mediaInfo = new CallMediaInfo();

        // Modify media to put call on hold
        mediaInfo.setStatus(pjsua_call_media_status.PJSUA_CALL_MEDIA_LOCAL_HOLD);
        mediaInfos.add(mediaInfo);

        // Send re-INVITE with SDP indicating hold
        call.setMedia(mediaInfos, param);
    } catch (Exception e) {
        System.out.println("Hold failed: " + e);
    }
}

public void resumeCall(Call call) {
    try {
        CallOpParam param = new CallOpParam();
        param.setOptions(pjsua_call_flag.PJSUA_CALL_UPDATE_CONTACT);

        // Create media session
        CallMediaInfoVector mediaInfos = new CallMediaInfoVector();
        CallMediaInfo mediaInfo = new CallMediaInfo();

        // Modify media to resume call
        mediaInfo.setStatus(pjsua_call_media_status.PJSUA_CALL_MEDIA_ACTIVE);
        mediaInfos.add(mediaInfo);

        // Send re-INVITE with SDP indicating resume
        call.setMedia(mediaInfos, param);
    } catch (Exception e) {
        System.out.println("Resume failed: " + e);
    }
}

// Implementation for call transfer
public void transferCall(Call call, String transferDestination) {
    try {
        CallOpParam param = new CallOpParam();
        param.setStatusCode(pjsua_constants.PJSIP_SC_OK);

        // Initiate call transfer
        call.xfer(transferDestination, param);
    } catch (Exception e) {
        System.out.println("Transfer failed: " + e);
    }
}

// Implementation for conference capabilities
public void createConference(List<Call> calls) {
    try {
        // Create a conference bridge
        ConferenceBridge conf = new ConferenceBridge();

        // Add calls to the conference
        for (Call call : calls) {
            // Get call media
            Media media = call.getMedia(0);

            // Connect media to conference bridge
            media.startTransmit(conf.getConfPort());
            conf.getConfPort().startTransmit(media);
        }
    } catch (Exception e) {
        System.out.println("Conference creation failed: " + e);
    }
}
Step 8: Implementing the User Interface
This step involves creating screens and controls for users to interact with.
It typically includes login and registration screens where users enter their SIP credentials, a dial pad for making calls, call screens with options like mute, hold, and other controls, call logs showing previous calls, and a settings section where users can configure their SIP account and preferences.
// Main application UI with basic SIP client functionality
public class SipClientUI extends JFrame {
    private JTextField serverField;
    private JTextField usernameField;
    private JPasswordField passwordField;
    private JButton loginButton;
    private JButton logoutButton;

    private JTextField destinationField;
    private JButton callButton;
    private JButton hangupButton;
    private JButton holdButton;
    private JButton transferButton;

    private JLabel statusLabel;
    private JList<String> callHistoryList;
    private DefaultListModel<String> callHistoryModel;

    private SipManager sipManager; // Your SIP implementation class

    public SipClientUI() {
        super("SIP Client");
        sipManager = new SipManager();

        // Set up UI components
        setLayout(new BorderLayout());

        // Login panel
        JPanel loginPanel = new JPanel(new GridLayout(4, 2));
        loginPanel.add(new JLabel("SIP Server:"));
        serverField = new JTextField("sip.example.com");
        loginPanel.add(serverField);

        loginPanel.add(new JLabel("Username:"));
        usernameField = new JTextField();
        loginPanel.add(usernameField);

        loginPanel.add(new JLabel("Password:"));
        passwordField = new JPasswordField();
        loginPanel.add(passwordField);

        loginButton = new JButton("Login");
        loginPanel.add(loginButton);

        logoutButton = new JButton("Logout");
        logoutButton.setEnabled(false);
        loginPanel.add(logoutButton);

        // Call panel
        JPanel callPanel = new JPanel(new GridLayout(3, 2));
        callPanel.add(new JLabel("Call Destination:"));
        destinationField = new JTextField();
        callPanel.add(destinationField);

        callButton = new JButton("Call");
        callButton.setEnabled(false);
        callPanel.add(callButton);

        hangupButton = new JButton("Hang Up");
        hangupButton.setEnabled(false);
        callPanel.add(hangupButton);

        holdButton = new JButton("Hold");
        holdButton.setEnabled(false);
        callPanel.add(holdButton);

        transferButton = new JButton("Transfer");
        transferButton.setEnabled(false);
        callPanel.add(transferButton);

        // Status and history
        statusLabel = new JLabel("Not connected");
        callHistoryModel = new DefaultListModel<>();
        callHistoryList = new JList<>(callHistoryModel);
        JScrollPane scrollPane = new JScrollPane(callHistoryList);

        // Add panels to frame
        JPanel topPanel = new JPanel(new BorderLayout());
        topPanel.add(loginPanel, BorderLayout.NORTH);
        topPanel.add(callPanel, BorderLayout.CENTER);

        add(topPanel, BorderLayout.NORTH);
        add(statusLabel, BorderLayout.CENTER);
        add(scrollPane, BorderLayout.SOUTH);

        // Add action listeners
        loginButton.addActionListener(e -> login());
        logoutButton.addActionListener(e -> logout());
        callButton.addActionListener(e -> makeCall());
        hangupButton.addActionListener(e -> endCall());
        holdButton.addActionListener(e -> toggleHold());
        transferButton.addActionListener(e -> transferCall());

        // Configure window
        setSize(400, 500);
        setDefaultCloseOperation(JFrame.EXIT_ON_CLOSE);
        setVisible(true);
    }

    private void login() {
        try {
            String server = serverField.getText();
            String username = usernameField.getText();
            String password = new String(passwordField.getPassword());

            sipManager.initialize();
            sipManager.registerAccount(server, username, password);

            statusLabel.setText("Connected as " + username);
            loginButton.setEnabled(false);
            logoutButton.setEnabled(true);
            callButton.setEnabled(true);

            // Set up call event handler
            sipManager.setCallListener(new CallListener() {
                @Override
                public void onIncomingCall(Call call) {
                    // Show incoming call dialog
                    int option = JOptionPane.showConfirmDialog(
                        SipClientUI.this,
                        "Incoming call from " + call.getInfo().getRemoteUri(),
                        "Incoming Call",
                        JOptionPane.YES_NO_OPTION
                    );

                    if (option == JOptionPane.YES_OPTION) {
                        sipManager.answerCall(call);
                        callHistoryModel.addElement("Incoming: " + call.getInfo().getRemoteUri());
                        hangupButton.setEnabled(true);
                        holdButton.setEnabled(true);
                        transferButton.setEnabled(true);
                    } else {
                        sipManager.rejectCall(call);
                    }
                }

                @Override
                public void onCallStateChanged(Call call) {
                    updateCallStatus(call);
                }

                @Override
                public void onCallEnded(Call call) {
                    statusLabel.setText("Call ended");
                    hangupButton.setEnabled(false);
                    holdButton.setEnabled(false);
                    transferButton.setEnabled(false);
                }
            });

        } catch (Exception e) {
            statusLabel.setText("Login failed: " + e.getMessage());
        }
    }

    private void logout() {
        sipManager.unregister();
        sipManager.shutdown();

        statusLabel.setText("Not connected");
        loginButton.setEnabled(true);
        logoutButton.setEnabled(false);
        callButton.setEnabled(false);
        hangupButton.setEnabled(false);
        holdButton.setEnabled(false);
        transferButton.setEnabled(false);
    }

    private void makeCall() {
        try {
            String destination = destinationField.getText();
            Call call = sipManager.makeCall(destination);

            callHistoryModel.addElement("Outgoing: " + destination);
            statusLabel.setText("Calling " + destination);
            hangupButton.setEnabled(true);
        } catch (Exception e) {
            statusLabel.setText("Call failed: " + e.getMessage());
        }
    }

    private void endCall() {
        sipManager.endCurrentCall();
        statusLabel.setText("Call ended");
        hangupButton.setEnabled(false);
        holdButton.setEnabled(false);
        transferButton.setEnabled(false);
    }

    private void toggleHold() {
        if (sipManager.isCallOnHold()) {
            sipManager.resumeCurrentCall();
            holdButton.setText("Hold");
            statusLabel.setText("Call resumed");
        } else {
            sipManager.holdCurrentCall();
            holdButton.setText("Resume");
            statusLabel.setText("Call on hold");
        }
    }

    private void transferCall() {
        String transferTarget = JOptionPane.showInputDialog(
            this,
            "Enter transfer destination:",
            "Call Transfer",
            JOptionPane.QUESTION_MESSAGE
        );

        if (transferTarget != null && !transferTarget.isEmpty()) {
            sipManager.transferCurrentCall(transferTarget);
            statusLabel.setText("Transferring call to " + transferTarget);
        }
    }

    private void updateCallStatus(Call call) {
        pjsip_inv_state state = call.getInfo().getState();

        switch (state) {
            case PJSIP_INV_STATE_CALLING:
                statusLabel.setText("Calling...");
                break;
            case PJSIP_INV_STATE_INCOMING:
                statusLabel.setText("Incoming call...");
                break;
            case PJSIP_INV_STATE_EARLY:
                statusLabel.setText("Ringing...");
                break;
            case PJSIP_INV_STATE_CONNECTING:
                statusLabel.setText("Connecting...");
                break;
            case PJSIP_INV_STATE_CONFIRMED:
                statusLabel.setText("Call established");
                holdButton.setEnabled(true);
                transferButton.setEnabled(true);
                break;
            case PJSIP_INV_STATE_DISCONNECTED:
                statusLabel.setText("Call disconnected");
                hangupButton.setEnabled(false);
                holdButton.setEnabled(false);
                transferButton.setEnabled(false);
                break;
        }
    }

    public static void main(String[] args) {
        SwingUtilities.invokeLater(() -> new SipClientUI());
    }
}
Step 9: Set up security features
This step includes using TLS (Transport Layer Security) to encrypt SIP signaling messages, making call details harder to intercept. It also involves setting up SRTP (Secure Real-time Transport Protocol) to encrypt audio and video during calls.
Additionally, strong authentication mechanisms are implemented to verify user identities and prevent unauthorized access.
// Implementing TLS for SIP signaling
public void configureTlsTransport() {
    try {
        // Create transport configuration for TLS
        TransportConfig transportConfig = new TransportConfig();
        transportConfig.setPort(5061); // Standard TLS port for SIP

        // Create TLS configuration
        TlsConfig tlsConfig = new TlsConfig();
        tlsConfig.setCaListFile("path/to/ca-list.pem");
        tlsConfig.setCertFile("path/to/certificate.pem");
        tlsConfig.setPrivKeyFile("path/to/private-key.pem");
        tlsConfig.setVerifyServer(true);
        tlsConfig.setVerifyClient(true);

        transportConfig.setTlsConfig(tlsConfig);

        // Create the transport
        Transport transport = endpoint.transportCreate(
            pjsip_transport_type_e.PJSIP_TRANSPORT_TLS,
            transportConfig
        );

        System.out.println("TLS transport created on port " + transport.getInfo().getListenPort());
    } catch (Exception e) {
        System.out.println("TLS transport creation failed: " + e);
    }
}

// Setting up SRTP for media encryption
public void configureSrtp() {
    try {
        // Configure SRTP as mandatory for media
        MediaConfig mediaConfig = endpoint.mediaConfig();

        // Set SRTP usage to mandatory
        mediaConfig.setSrtpUse(pjmedia_srtp_use.PJMEDIA_SRTP_MANDATORY);

        // Set SRTP secure signaling to TLS
        mediaConfig.setSrtpSecureSignaling(1); // 1 = TLS

        // Apply configuration
        endpoint.mediaConfigSetSrtp(mediaConfig);

        System.out.println("SRTP configured successfully");
    } catch (Exception e) {
        System.out.println("SRTP configuration failed: " + e);
    }
}

// Enhanced authentication with digest and nonce handling
public void configureAdvancedAuthentication(Account account, String realm, String username, String password) {
    try {
        // Create authentication credentials
        AuthCredInfo cred = new AuthCredInfo(
            "digest",  // Scheme (usually digest for SIP)
            realm,     // Realm
            username,  // Username
            0,         // Data type (0 for plaintext password)
            password   // The password
        );

        // Get account config
        AccountConfig accCfg = account.getInfo().getRegConfig();

        // Add credentials to account config
        accCfg.getSipConfig().getAuthCreds().add(cred);

        // Enable authentication qop (quality of protection)
        accCfg.getSipConfig().setAuthInitialEmpty(pjsua_constants.PJ_TRUE);
        accCfg.getSipConfig().setAuthQopOptions("auth,auth-int");

        // Apply modified config
        account.modify(accCfg);

        System.out.println("Enhanced authentication configured");
    } catch (Exception e) {
        System.out.println("Authentication configuration failed: " + e);
    }
}
Step 10: Testing and Debugging
The final step is to thoroughly test the SIP client to ensure it works properly.
This includes verifying successful registration with the SIP server, testing incoming and outgoing calls, and checking all implemented features such as hold and call forwarding. It is also important to ensure the client functions reliably under different network conditions and to identify and fix any bugs or issues found during testing.
// Log callback implementation for debugging
public class SipLogger extends LogWriter {
    private static final String LOG_TAG = "SipClient";
    private int logLevel = 5; // 0-6, 6 being the most verbose

    @Override
    public void write(LogEntry entry) {
        // Check if we should log this entry based on level
        if (entry.getLevel() <= logLevel) {
            // Format log message
            String message = formatLogMessage(entry);

            // Log based on level
            switch (entry.getLevel()) {
                case 0: // Fatal
                case 1: // Error
                    System.err.println(message);
                    break;
                default: // Info, debug, etc.
                    System.out.println(message);
            }
        }
    }

    private String formatLogMessage(LogEntry entry) {
        StringBuilder sb = new StringBuilder();
        sb.append("[").append(LOG_TAG).append("] ");
        sb.append("[").append(getLevelString(entry.getLevel())).append("] ");
        sb.append(entry.getMsg());
        return sb.toString();
    }

    private String getLevelString(int level) {
        switch (level) {
            case 0: return "FATAL";
            case 1: return "ERROR";
            case 2: return "WARN";
            case 3: return "INFO";
            case 4: return "DEBUG";
            case 5: return "TRACE";
            default: return "VERBOSE";
        }
    }

    public void setLogLevel(int level) {
        if (level >= 0 && level <= 6) {
            this.logLevel = level;
        }
    }
}

// Implementation for SIP call testing
public class SipTester {
    private SipManager sipManager;
    private List<TestResult> testResults = new ArrayList<>();

    public SipTester(SipManager sipManager) {
        this.sipManager = sipManager;
    }

    // Test registration
    public TestResult testRegistration(String server, String username, String password) {
        TestResult result = new TestResult("Registration");

        try {
            // Set up registration listener
            final CountDownLatch latch = new CountDownLatch(1);
            final boolean[] success = {false};
            final String[] errorMessage = {null};

            RegistrationListener listener = new RegistrationListener() {
                @Override
                public void onRegistrationSuccess() {
                    success[0] = true;
                    latch.countDown();
                }

                @Override
                public void onRegistrationFailed(String error) {
                    success[0] = false;
                    errorMessage[0] = error;
                    latch.countDown();
                }
            };

            // Register with server
            sipManager.setRegistrationListener(listener);
            sipManager.registerAccount(server, username, password);

            // Wait for result with timeout
            boolean completed = latch.await(5, TimeUnit.SECONDS);

            if (!completed) {
                result.setSuccess(false);
                result.setMessage("Registration timed out");
            } else if (success[0]) {
                result.setSuccess(true);
                result.setMessage("Registration successful");
            } else {
                result.setSuccess(false);
                result.setMessage("Registration failed: " + errorMessage[0]);
            }

            // Clean up
            sipManager.unregister();

        } catch (Exception e) {
            result.setSuccess(false);
            result.setMessage("Exception during registration test: " + e.getMessage());
        }

        testResults.add(result);
        return result;
    }

    // Test making outbound call
    public TestResult testOutboundCall(String destination) {
        TestResult result = new TestResult("Outbound Call");

        try {
            // Set up call listener
            final CountDownLatch latch = new CountDownLatch(1);
            final boolean[] success = {false};

            CallListener listener = new CallListener() {
                @Override
                public void onCallStateChanged(Call call) {
                    if (call.getInfo().getState() == pjsip_inv_state.PJSIP_INV_STATE_CONFIRMED) {
                        success[0] = true;
                        latch.countDown();
                    } else if (call.getInfo().getState() == pjsip_inv_state.PJSIP_INV_STATE_DISCONNECTED) {
                        latch.countDown();
                    }
                }

                @Override
                public void onIncomingCall(Call call) {
                    // Not expected in this test
                }

                @Override
                public void onCallEnded(Call call) {
                    latch.countDown();
                }
            };

            // Make call
            sipManager.setCallListener(listener);
            Call call = sipManager.makeCall(destination);

            // Wait for result with timeout
            boolean completed = latch.await(10, TimeUnit.SECONDS);

            if (!completed) {
                result.setSuccess(false);
                result.setMessage("Call test timed out");
            } else if (success[0]) {
                result.setSuccess(true);
                result.setMessage("Call connected successfully");

                // End the test call
                sipManager.endCurrentCall();
            } else {
                result.setSuccess(false);
                result.setMessage("Call failed to connect");
            }

        } catch (Exception e) {
            result.setSuccess(false);
            result.setMessage("Exception during call test: " + e.getMessage());
        }

        testResults.add(result);
        return result;
    }

    // Test network resilience
    public TestResult testNetworkResilience() {
        TestResult result = new TestResult("Network Resilience");

        try {
            // Simulate network condition changes
            TransportConfig transportConfig = new TransportConfig();

            // Test with higher latency
            transportConfig.setQosType(pj_qos_type.PJ_QOS_TYPE_VOICE);
            sipManager.updateTransportConfig(transportConfig);

            result.setSuccess(true);
            result.setMessage("Network resilience test passed");

        } catch (Exception e) {
            result.setSuccess(false);
            result.setMessage("Network resilience test failed: " + e.getMessage());
        }

        testResults.add(result);
        return result;
    }

    // Get test results summary
    public String getTestSummary() {
        StringBuilder sb = new StringBuilder();
        sb.append("SIP Client Test Results\n");
        sb.append("=====================\n\n");

        int passed = 0;
        for (TestResult result : testResults) {
            sb.append(result.getName()).append(": ");
            sb.append(result.isSuccess() ? "PASSED" : "FAILED");
            sb.append(" - ").append(result.getMessage()).append("\n");

            if (result.isSuccess()) {
                passed++;
            }
        }

        sb.append("\nSummary: ").append(passed).append("/").append(testResults.size());
        sb.append(" tests passed (");
        sb.append(Math.round((double)passed / testResults.size() * 100));
        sb.append("%)\n");

        return sb.toString();
    }

    // Test result class
    public static class TestResult {
        private String name;
        private boolean success;
        private String message;

        public TestResult(String name) {
            this.name = name;
        }

        public String getName() {
            return name;
        }

        public boolean isSuccess() {
            return success;
        }

        public void setSuccess(boolean success) {
            this.success = success;
        }

        public String getMessage() {
            return message;
        }

        public void setMessage(String message) {
            this.message = message;
        }
    }
}

// Main testing class
public static void main(String[] args) {
    try {
        // Create SIP manager instance
        SipManager sipManager = new SipManager();

        // Initialize library with custom logger
        SipLogger logger = new SipLogger();
        logger.setLogLevel(4); // Debug level
        sipManager.initialize(logger);

        // Create tester
        SipTester tester = new SipTester(sipManager);

        // Run tests
        System.out.println("Starting SIP client tests...");

        TestResult regResult = tester.testRegistration(
            "sip.example.com", "testuser", "testpassword"
        );
        System.out.println("Registration test: " +
            (regResult.isSuccess() ? "PASSED" : "FAILED"));

        if (regResult.isSuccess()) {
            TestResult callResult = tester.testOutboundCall("sip:echo@sip.example.com");
            System.out.println("Outbound call test: " +
                (callResult.isSuccess() ? "PASSED" : "FAILED"));

            TestResult netResult = tester.testNetworkResilience();
            System.out.println("Network resilience test: " +
                (netResult.isSuccess() ? "PASSED" : "FAILED"));
        }

        // Print summary
        System.out.println("\n" + tester.getTestSummary());

        // Clean up
        sipManager.shutdown();

    } catch (Exception e) {
        System.err.println("Test execution failed: " + e);
        e.printStackTrace();
    }
}
Overwhelming right? But here’s the easy way!
👉 Part 2: Developing a SIP Client Using MirrorFly SDK
Step 1: Set up a MirrorFly account
First, create a developer account on the MirrorFly website by contacting their team. Once registered, obtain API keys and SDK credentials, which act as unique passwords to access MirrorFly SIP solution.
Then, download the MirrorFly SDK for the platform you are developing for, such as Android or iOS.
Step 2: Install the SDK
In this step, you add the MirrorFly SDK to your software project. The example shows how to work in an Android project using the Gradle tool.
// In build.gradle (Android example)
dependencies {
    implementation 'com.mirrorfly:voip-sdk:x.y.z'
}
Step 3: Initialize the SDK
Before using the MirrorFly SDK, you must start it in your app. This process is called initialization.
The example code below uses the MirrorFlyClient.initialize() function, which requires an API key and a special listener to track success or failure.
If the initialization is successful, the message “SDK initialized successfully” will appear. If it fails, an error message will be logged.
// Initialize MirrorFly SDK
MirrorFlyClient.initialize(context, "YOUR_API_KEY", new InitializeListener() {
    @Override
    public void onInitializeSuccess() {
        Log.d("MirrorFly", "SDK initialized successfully");
    }

    @Override
    public void onInitializeFailed(String errorMessage) {
        Log.e("MirrorFly", "SDK initialization failed: " + errorMessage);
    }
});
Step 4: Configure SIP Account
In this step, you will set up the MirrorFly SDK to connect to your SIP server by providing your SIP account details.
The example uses SipConfig.Builder to specify the SIP domain (server address), username, password, port (usually 5060), and connection type (such as UDP).
Once the configuration is created, it is applied using MirrorFlyClient.getInstance().configureSip(). A listener will notify you if the setup is successful.
// Configure SIP account with MirrorFly
SipConfig sipConfig = new SipConfig.Builder()
    .setDomain("sipserver.com")
    .setUsername("username")
    .setPassword("password")
    .setPort(5060)
    .setTransportType(TransportType.UDP)
    .build();

MirrorFlyClient.getInstance().configureSip(sipConfig, new SipConfigListener() {
    @Override
    public void onConfigSuccess() {
        Log.d("MirrorFly", "SIP configured successfully");
    }

    @Override
    public void onConfigFailed(String errorMessage) {
        Log.e("MirrorFly", "SIP configuration failed: " + errorMessage);
    }
});
Step 5: Registering a User
Once the SIP account is configured, you must register with the SIP server. This process logs you in and indicates that you are online and ready to receive calls.
The example code uses MirrorFlyClient.getInstance().register() with a RegistrationListener. This listener has functions that notify you when the registration is successful, fails, or gets canceled.
// Register user with SIP server
MirrorFlyClient.getInstance().register(new RegistrationListener() {
    @Override
    public void onRegistrationSuccess() {
        Log.d("MirrorFly", "Registration successful");
    }

    @Override
    public void onRegistrationFailed(String errorMessage) {
        Log.e("MirrorFly", "Registration failed: " + errorMessage);
    }

    @Override
    public void onUnregistered() {
        Log.d("MirrorFly", "Unregistered from server");
    }
});
Step 6: Making and Receiving Calls
With the MirrorFly SDK, you can make and receive voice calls.
To make an outgoing call, use MirrorFlyClient.getInstance().makeCall(), providing the recipient’s SIP address (e.g., sip:recipient@sipserver.com). A listener will notify you whether the call starts successfully or fails.
To handle incoming calls, create a class that implements the CallListener interface. This interface includes functions for detecting when a call comes in (onIncomingCall), tracking call state changes (onCallStateChanged), and handling call disconnection (onCallEnded).
The onIncomingCall function allows you to show an incoming call screen. To accept the call, use MirrorFlyClient.getInstance().acceptCall() with the call’s unique ID. To reject it, use MirrorFlyClient.getInstance().rejectCall().
Finally, register a CallListener with the MirrorFly SDK so you receive notifications about call events.
// Make outgoing call
String calleeUri = "sip:recipient@sipserver.com";
MirrorFlyClient.getInstance().makeCall(calleeUri, new CallActionListener() {
    @Override
    public void onSuccess(String callId) {
        Log.d("MirrorFly", "Call initiated with ID: " + callId);
    }

    @Override
    public void onFailed(String errorMessage) {
        Log.e("MirrorFly", "Call failed: " + errorMessage);
    }
});

// For incoming calls, implement CallListener
public class MyCallListener implements CallListener {
    @Override
    public void onIncomingCall(CallInfo callInfo) {
        // Show incoming call UI
        // To accept:
        MirrorFlyClient.getInstance().acceptCall(callInfo.getCallId());

        // To reject:
        // MirrorFlyClient.getInstance().rejectCall(callInfo.getCallId());
    }

    @Override
    public void onCallStateChanged(CallInfo callInfo) {
        // Handle call state changes
    }

    @Override
    public void onCallEnded(CallInfo callInfo) {
        // Handle call ended
    }
}

// Register the call listener
MirrorFlyClient.getInstance().setCallListener(new MyCallListener());
Step 7: Implementing Call Controls & Launch
The MirrorFly SDK provides built-in controls for managing calls.
You can mute or unmute the microphone using MirrorFlyClient.getInstance().muteCall(), turn the speaker on or off with setSpeakerMode(), hold and resume calls with holdCall() and resumeCall(), and end a call using endCall().
For the user interface, you can either use MirrorFly’s pre-built UI components for faster development or design your own custom interface and integrate MirrorFly’s features for SIP calls.
Advanced features like call transfer can be implemented using transferCall(), video calls can be initiated with makeVideoCall(), and you can switch between audio and video during a call using switchToVideo() and switchToAudio().
Finally, thorough testing is essential. This includes verifying SIP registration, making and receiving calls, and ensuring all features work under different conditions. You should also implement proper error handling to manage potential issues before deployment.
That’s pretty much easy with MirrorFly. You can simply add SIP calling with MirrorFly SDK within a matter of minutes.
Why We Recommend Building SIP Client With MirrorFly
We’ve discussed it all: options to use simple software phones from providers to fully customized VoIP solution.
For many companies, the best compromise lies somewhere in between: budget and features. MirrorFly offers them both.
And you witnessed it yourself. MirrorFly’s provides low-code and they are light-weight, easy to build and customize, when compared to building from scratch as we did in part 1.
You can customize the solution as much as you need, get 100% data ownership and full source code access. You can drive unlimited inbound and outbound calls, and deploy your platform on any servers. Additionally, you’ll be able to build the entire solution and launch it within 48 hrs. Who wouldn’t want a solution that’s quick, customizable and offers full control.
If you are excited about this solution, wait not a minute. Fill out this form and one of our experts will get in touch with you in the next 48 hrs!
FAQ
VoIP client (Voice over Internet Protocol) is a software or hardware device that uses internet to make and receive voice calls transmitted as data packets. Receiver’s VoIP client converts the data back into audio. It offers instant messaging and video conferencing features. Examples: Microsoft Teams, WhatsApp, VoIP phones.
Asterisk and FreeSWITCH are open-source software used to build VoIP systems applicable for internal or private calls. And, Twilio, Vonage, MirrorFly, Plivo, and RingCentral provide APIs to integrate VoIP features into your application for public or external communication.
Yes, for internal systems, you can use open-source software (Asterisk or FreeSwitch). But to make public or external calls, you have to subscribe to a VoIP service provider. You can also build your own full custom VoIP app from scratch using WebRTC and cloud services.
SIP softphone is a software that makes and receives calls over internet using the Session Initiation Protocol (SIP). It can be installed in computers, smartphones, or tablets and then configured with a SIP account credentials. It eliminates the need for a physical desk phone. SIP softphone software examples are Zoiper, MicroSIP, 3CX Softphone, and Bria.
You need an internet-enabled device (computer, smartphone, or tablet), audio equipment (microphone and speakers), a softphone application, and a service account from a provider.
Ready To Build Your Softphone SIP VOIP Client!
Get our enterprise-grade communication solution, that can be set up on your company servers.
Request Demo 100% customizable
-
White-label solution
-
Full source code

Other Related Blog
![]() Atchaya Jayabal leads Content at MirrorFly and is an expert in writing Tech, SaaS & B2B. She regularly publishes articles on CPaaS & Conversational AI in blogs.
Atchaya Jayabal leads Content at MirrorFly and is an expert in writing Tech, SaaS & B2B. She regularly publishes articles on CPaaS & Conversational AI in blogs.
The options for how to build a Softphone VoIP client from ready made apps to full custom development—are really helpful for businesses. I also agree that choosing the right SDK and focusing on user experience are key to success.
Great guide! It’s perfect for beginners looking to get into building their own VoIP SIP client. The step-by-step instructions make it clear and approachable, and I appreciate the practical tips for troubleshooting along the way.