Send a Message
To send the message to the user, use the below methods. Different messages such as text, image, audio, video & document type messages can be sent using the below methods.
Note: When you call the methods listed below, the messageListener callback will trigger based on the method you are calling.
Text Message#
Request Param#
| Status | Description | Type | Required |
|---|---|---|---|
| TO_USER_JID | JID of the To User. username + "@" + xmppSocketHost | JID String | true |
| MESSAGE_BODY | Text Message Body | String | true |
| MESSAGE_ID | Text Message Id | String | true |
| REPLY_TO | Specifies the Message ID of replied message (Optional) | String | false |
Response Format:#
Location Message#
Request Param#
| Status | Description | Type | Required |
|---|---|---|---|
| TO_USER_JID | JID of the To User. username + "@" + xmppSocketHost | JID String | true |
| LATITUDE | location latitude which needs to be sent | Number | true |
| LONGITUDE | location longitude which needs to be sent | Number | true |
| MESSAGE_ID | Location Message Id | String | false |
| REPLY_TO | Specifies the Message ID of replied message (Optional) | String | false |
Response Format:#
Contact Message#
Request Param#
| Status | Description | Type | Required |
|---|---|---|---|
| TO_USER_JID | JID of the To User. username + "@" + xmppSocketHost | JID String | true |
| CONTACTS | list of numbers in that contact | Array of Object | true |
| REPLY_TO | Specifies the Message ID of replied message (Optional) | String | false |
Response Format:#
Media Message#
Media Service setup in Android#
Step 1: Download the Android file from the link above,
Locate the necessary Android files, and copy them into the
android/app/src/main/java/comdirectory. Then, follow the steps below.Locate the necessary jni folder, and copy them into the
android/app/directory. Then, follow the steps below.
Step 2: open your app-level build.gradle file located at: android/app/build.gradle, add the following dependencies:
Step 3: Navigate to your Android project directory: android/app/src/main/java/com/yourpackage/, Create a new Kotlin file named MFModule.kt in this directory. Add the following code snippet to the file:
Note: Please ignore this if you already have
MFModule.javaorMFModule.kt. Otherwise, add the following line to the existing modules:MediaService(reactContext)
Step 4: Download the above zip file and extract. Copy all the files inside the extracted folder
and paste it inside project/android/app/src/main/java/com/[packageName]. After pasted all the files add the MFModule in
MainApplication.kt file as mentioned in the below code snippet.
Note: Please ignore this if you already have.
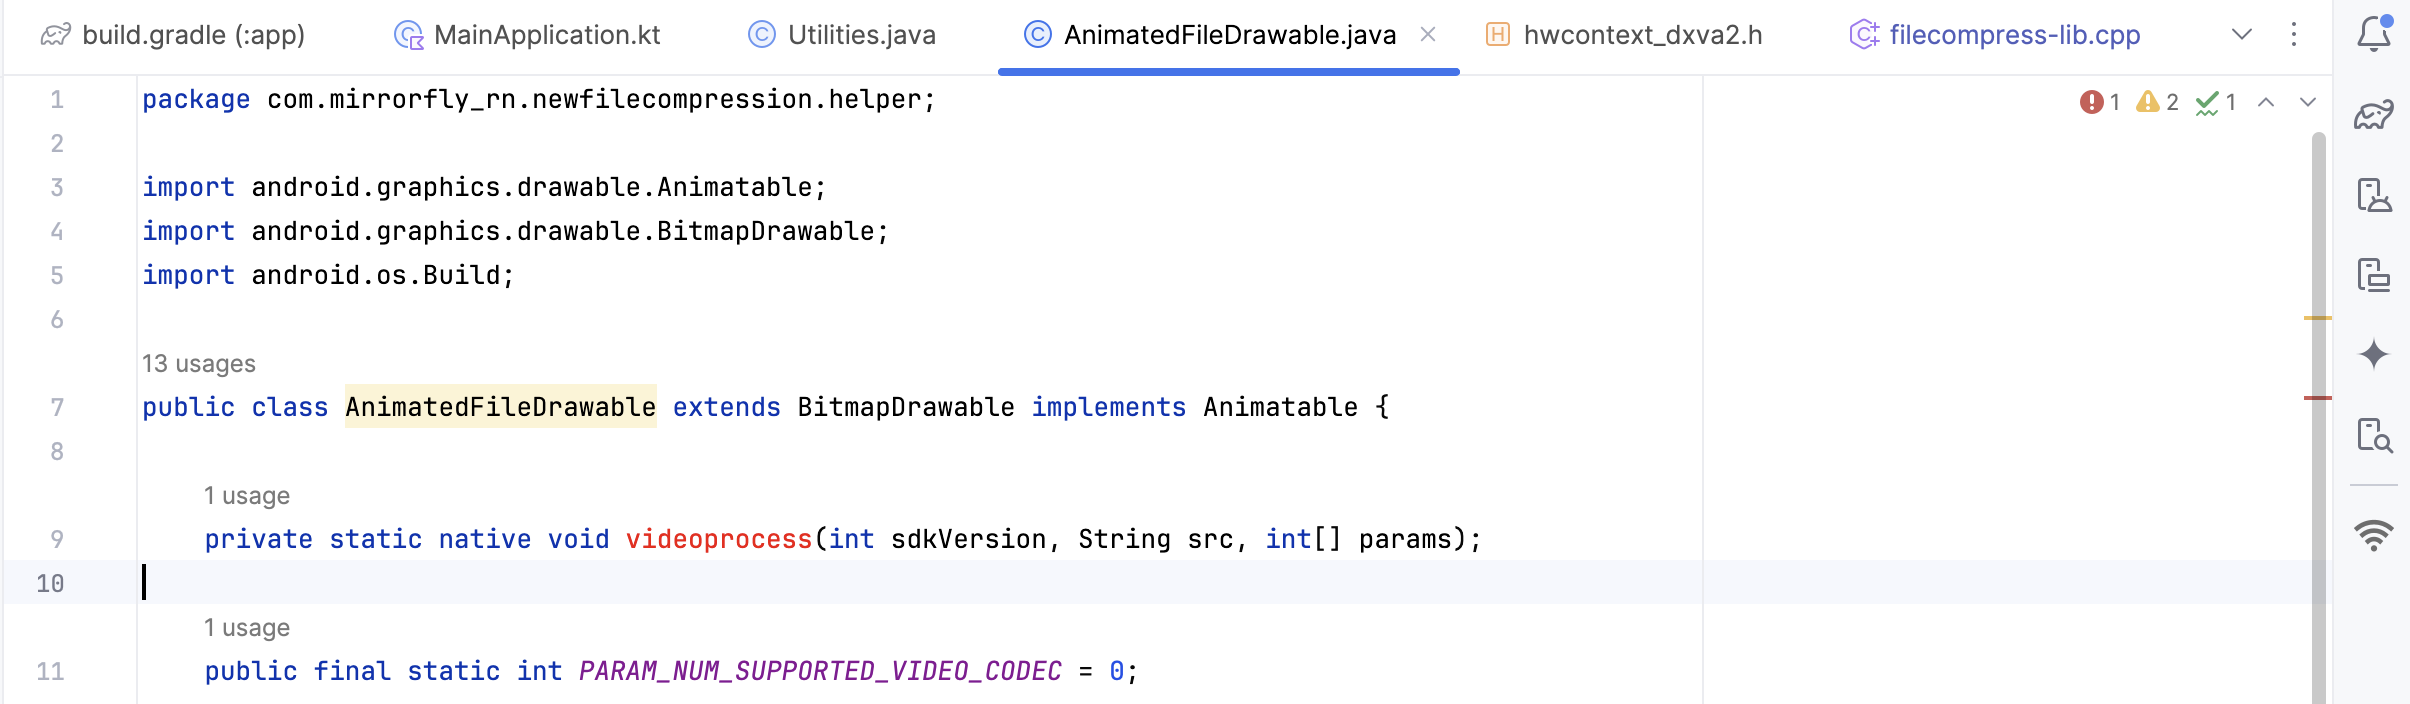
Note: Once it's all done please verify this file
AnimatedFileDrawablefaced as below image, please follow the video
Media Service setup in iOS#
Step 1: Modify the Podfile: Open your Podfile located in the ios folder, and inside the target YOUR_TARGET do block, add the following dependency:
Step 2: Download the files from the link above, locate the necessary iOS files, and add them using Add Files to [Your Project] in Xcode. Then, follow the steps below
Step 3: If you are already using the bridge header, you can skip this setup. Otherwise, please create a bridge header, Steps to Create a Bridging Header in Xcode
Open Your Xcode Project
In your React Native project, navigate to the
iosfolder and open the.xcworkspacefile in Xcode.Add a New Swift File
In Xcode, go to
File → New → File.Select Swift File under the Source section and click Next.
Name the file (e.g.,
Dummy.swift).Click Create.
Automatic Pop-up for Bridging Header
When you create the Swift file, a pop-up will appear asking: "Would you like to configure an Objective-C bridging header?"
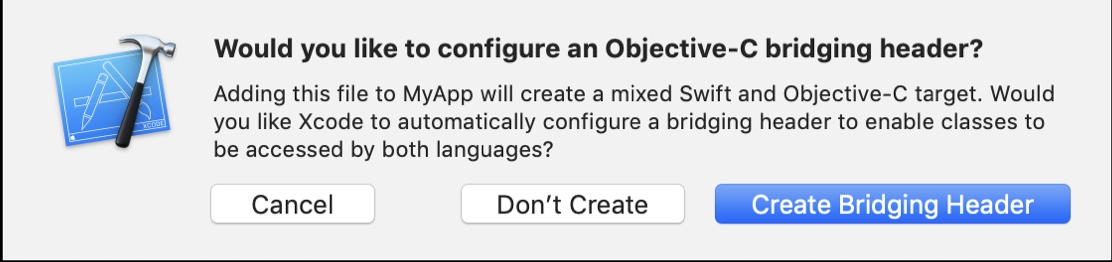
Click "Create Bridging Header".
Xcode will automatically generate a file named:
Note: Before implementing the method, confirm that all required dependencies and libraries are properly installed.
Media Compress#
Compress a local media file with adjustable quality using below methods.
Request Param toJid,#
| Status | Description | Type | Required |
|---|---|---|---|
| uri | The string to access that file | String | true |
| quality | To adjust the out put quality of the image / video, by default it will 'medium' | String | false |
Note: We have certain limitations in quality adjustments, as indicated by the following options:
best,high,medium,low, anduncompressed. These quality settings apply to both video and audio on iOS but only work for images on Android.
Usage Example:#
Request Param toJid,#
| Status | Description | Type | Required |
|---|---|---|---|
| TO_USER_JID | JID of the To User. username + "@" + xmppSocketHost | JID String | true |
| MESSAGE_ID | Message Id (unique id for each message, you have to pass fileOptions.msgId) | String | true |
| MESSAGE_TYPE | Media Message type image or video or audio or file | String | true |
| FILE_DETAILS | Media File | Object | true |
| FILE_OPTIONS | Media File Object | Object | true |
| REPLY_TO | Specifies the Message ID of replied message (Optional) | String | true |
Note: ALLOWED_ALL_FILE_FORMATS = [ 'jpg', 'jpeg', 'png', 'mp3', 'wav', 'aac', 'mpeg', 'mp4', 'doc', 'docx', 'pdf', 'xls', 'xlsx', 'txt', 'csv', 'ppt', 'zip', 'rar', 'pptx', 'acc', 'heic', 'heif', 'mov', ];
caution
The methods sendImageMessage, sendVideoMessage, sendAudioMessage, and sendDocumentMessage have been deprecated and will be removed in the future release. Migrate to method sendMediaMessage ensuring better maintainability and consistency across media types.
Response Format:#
Download Media#
Use the below method to return local path for media attachment .
Example Request#
Example Response#
Send Reply Message#
Request Param#
| Status | Description | Type | Required |
|---|---|---|---|
| TO_USER_JID | JID of the To User. username + "@" + xmppSocketHost | JID String | true |
| MESSAGE_BODY | Text Message Body | String | true |
| MESSAGE_ID | Text Message Id | String | true |
| REPLY_TO | Message ID of Original Message | String | true |